
For a lot of the forms on our sites, we use a plugin called Gravity Forms. This plugin allows us to create comprehensive forms in an efficient manner. This article will go over some of the basics, but you can find more detailed information in the Gravity Forms Documentation.
Setting up the Form
To create a new form, you’ll need to find Forms on the left-hand sidebar of the backend of your site, typically in the middle. On some sites, it may also be on the top bar as well. Hover over whichever one you find, and then select New Form from the dropdown.
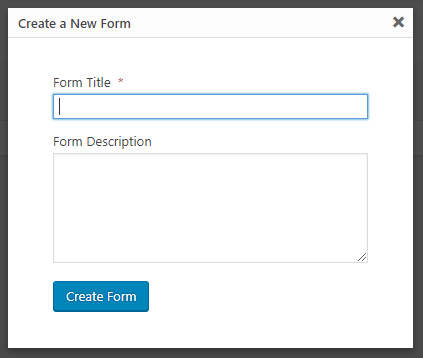
A window will pop up where you can enter the form’s title and description. Only the title is mandatory. Once you have a title and description that you like, click Create Form.
Note: If you did not access this form via the list of forms, you will be taken there before this pop-up appears. To get there yourself, simply click on the Forms link from above instead of hovering over it. Then you can click on Add New to get to this window.
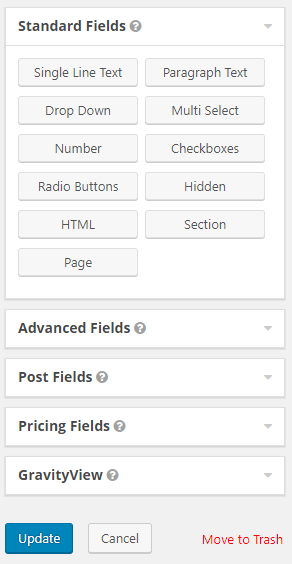
You will then be taken to the page where you create the form. When you create a new form, there will be instructions on the page of how to add fields to the form, so we won’t go into too much detail here. Essentially what you do is click on the type of field you wish to add, and it will be added.
Most commonly, you’l be interacting with the Standard Fields and Advanced Fields. Standard Fields contain basic entry types, such as text, radio buttons, checkboxes, etc. Advanced Fields contain fields for specific things, such as name, address, email, things of that nature that are common to a lot of different forms. Feel free to peruse the field type options that are available to you.
Once you have the form fields you want in your form the way you want them, click Update. In terms of what users see, you’re done once you do that. If you’d like to see a preview to make sure everything looks okay, you can click Preview in the top bar.
Editing the Form Settings
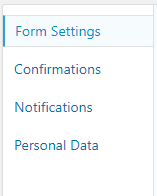
To edit more backend or functional things about your form, click on the Settings option in the top bar.

There are four categories of settings you can set on your forms.
Form Settings – The basic settings on your form. There you can edit the title and description, change layouts, set restrictions, things of that nature.
Confirmations – This determines what the user sees when the form is submitted. You can have it display a custom message or re-route to another page.
Notifications – This is where you can set up email notifications for your form submissions. You can set up as many as you want, for as many different submission scenarios as you need.
Personal Data – This is where you can determine what data from the people is stored, and how long it’s stored for.
Adding the Form to a Page
Adding a form to a course is very straightforward. When you are creating a new page, or course, or post, or wherever you are putting the form, you can click on the Add Form button above the description box.

A field will then pop up that allows you to select the form you’re looking for. Click on the Select a Form dropdown and then select the form you wish to use. Once you do that, you can check or uncheck the boxes that display the title and description, depending on whether or not you want those shown (they are checked by default). Once you get the settings the way you like them click on Insert Form.
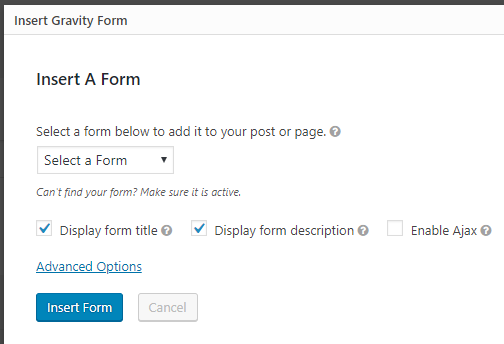
Clicking Insert Form will create a snippet of shortcode that will go in the description field. That snippet embeds the form into the page for users to fill out. Once you make the page live, the form will be live as well.
